| Trygve.Com > Images > Arts and Crafts | Translate this page:
|
Stained glass, for example. That all started when I was taking a peek in a high-priced gift shop and happened to see their display of stained glass kaleidoscopes. I looked at what they had on hand and thought, "those can't be too hard to make"--so I did. This one above was the first. 
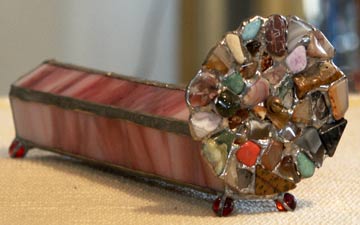
This one's just a litle more exotic: it's made with just one "wheel," but I used a variety of agate slices to make it, and the barrel is five-sided instead of three. |
|
|
There's a good reason stained glass kaleidoscopes are almost always three-sided: a triangle is a naturally stable shape, so working with a five-sided design, you have to exercise a little more care when tacking the pieces together to keep the shape from deforming or falling apart. But with a little patience, it's not too hard to do--and you don't need any special tools; I use the same soldering iron that I use for PC boards and general electronics and a $1.98 glass-cutter from a nearby hardware store. |
Funny thing is that, in this day and age, I hardly ever whip out the soldering iron and do component-level repairs on computers any more. The only time I've done that lately was when repairing the Cisco 3620 router I use out here at the treehouse--replacement boards for those cost a little bit more than ones for most computers these days, and, for that matter, so much is made these days with surface-mount and other soldering-iron-unfriendly packages, so it's hardly ever worth going past-board-level diagnosis and repair any more.
|
Chainmail's something I used to make more of back when I spent more time on the phone; it's hard to combine typing with chainmail (even if you're only using one keyboard), but as long as you've got your hands free, it's easy enough once you get the basic patterns down. I usually describe it to people as being like "macho knitting." It's true that working in chainmail isn't a lot like working on computers, except that both can involve a whole lot of wire. No matter how scary and tangled the back of a server rack, switch, or modem bank can get, it's still not as intricate as even a simple piece of chainmail. |
|
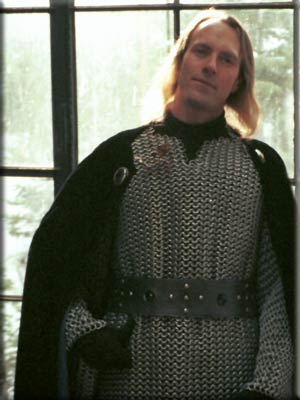
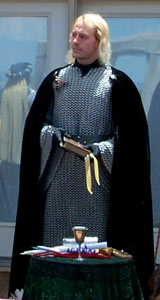
This is the only full-body suit of chainmail I've made; the design is pretty much entirely historically inaccurate, but it still looks good. If you really wanted to make a suit of armor for combat, you'd turn the lay ninety degrees and not use angel sleeves, but for ceremonial purposes it works fine. Even if it is a little heavier than most cloth-based ceremonial robes. |
|
|
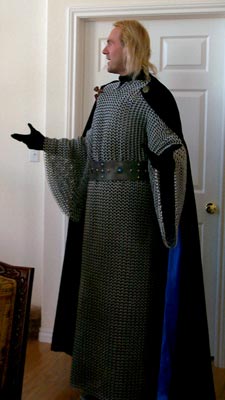
You'll probably notice that I usually work with a larger ring size than real chainmail armor would use. While a finer mesh is certainly what you'd want if you were in a real swordfight, the coarser mesh has the big advantage that it still looks like chainmail on camera. |
|
Authentic chainmail, especially when you see it on TV, tends to look more like a sweater. Of course, the easy "out" in that case is to just use a grey wool sweater, but that's less fun. |
|
A much faster project is the at-least-as-historically-inaccurate chainmail bikini. (Shown here modeled by the incomparable Deborah Hollis--you can thank me later for getting someone else to model for these pictures.) |

|
|
Obviously, the chainmail bikini requires less time and materials to create, so you can do it even if you aren't dealing with being stuck on the phone all the time. The trickiest part is that the pieces of the bikini top are smooth, but not flat; since Deborah isn't either, you can see how this is important for getting a proper fit. |

|
The piece behind her, by the way, is a black chainmail tunic I'd made for more of the "barbarian" look. It's done with an open hexagonal lay, which is more commonly used in oriental mail. |
|
Another way to cut down on construction time is to find smaller warriors for whom to make armor. In this case, we have "Sir Snuffles of Gund," which I'd made for my father (he's the taller one on the left). |

|
|
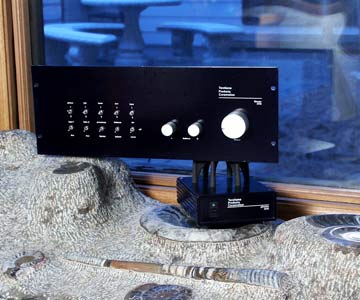
One of these days I really am going to have to start an audio equipment company (but don't try to pin me down to a schedule; I'm still pretty backlogged on the startup company front). This was a prototype I whipped up for one of my preamplifier designs. It's fairly streamlined design with a separate phono stage and an external triple-regulated power supply. One of the weird styling features is that it's less than three inches deep, which allows for very short signal paths and made it that much easier to keep all the internal parts shielded. It does, however, use more lead than most stereo components. There's an inch-thick bar of lead built into the bottom of it to keep it from falling over. |
|
|
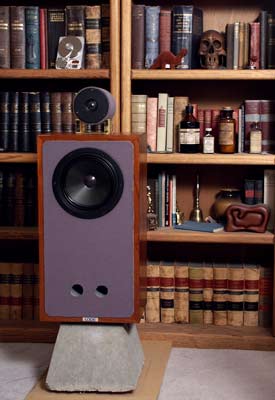
Using lead in loudspeakers is nothing new; In several designs, I've used a mixture of Bondo and lead shot when adding weight to speaker cabinets and "sculpting" the interior shape. My more radical speaker designs have been for surround speakers. This one is a more conventional vented two-way speaker design, built with Eton's 8-480/32-hex kevlar composite honeycomb cone woofer and Dynaudio's D-260 ESOTEC tweeter. The woofer cabinet is built from 3/4" plywood over 3/4" MDF (medium density fiberboard) and the front is covered with a layer of sound-absorbing cloth-faced foam. The tweeter's mounted in a separate "pod" that's filled with a mixture of Bondo and lead shot. |
|
Besides allowing for easy adjustments of the tweeter's angle and front-to-back position relative to the woofer, the modular construction of tweeter and woofer units allows for easy mixing-and-matching during prototyping. Since I have a preference for external line-level crossovers and dedicated amplifiers matched to the drivers, there's no other electronics in the individual enclosures to worry about apart than the drivers themselves. |
|